Asian-Inspired Furniture Plans for Minimalistic and Elegant Homes

Asian-Inspired Furniture Plans for Minimalistic and Elegant Homes

The serene beauty of Asian design offers a wealth of inspiration for creating minimalist and elegant homes. Its focus on clean lines, natural materials, and a sense of calm perfectly complements contemporary aesthetics. This article explores how you can incorporate Asian-inspired furniture pieces into your home, transforming your living spaces into tranquil oases of sophistication.

Understanding the Essence of Asian Design

Asian design philosophy emphasizes simplicity and functionality. It prioritizes natural materials like bamboo, rattan, teak, and paper, often showcasing their natural textures and grain. Subtlety is key; ornate details are avoided in favor of clean lines and understated elegance. Color palettes typically lean towards neutrals like beige, cream, gray, and black, punctuated by occasional pops of vibrant color, drawing inspiration from nature's hues. The overall effect aims for a harmonious balance between the furniture and the surrounding environment, fostering a sense of peace and tranquility.

Key Elements to Incorporate:

  • Low-slung furniture: Think floor cushions, low-profile sofas, and coffee tables that sit close to the ground. This creates a sense of intimacy and connection to the space.
  • Natural materials: Select pieces made from bamboo, rattan, teak, or reclaimed wood. These materials add warmth and texture without overpowering the minimalist aesthetic.
  • Minimalist silhouettes: Opt for furniture with clean lines and simple shapes. Avoid overly decorative pieces that could clutter the space.
  • Subtle accents: Introduce subtle Asian-inspired details like delicate carvings, hand-painted designs, or natural fiber accents.

Crafting a Minimalist Living Room with Asian Influences

Imagine a living room bathed in natural light, furnished with a low-slung, teakwood sofa, complemented by a sleek coffee table crafted from bamboo. Floor cushions scattered around the seating area invite relaxation and conversation. A simple, hand-woven rug anchors the space, its neutral tones enhancing the overall feeling of calm. A single, striking piece of art—perhaps a minimalist ink painting or a serene landscape photograph—adds a focal point, completing the look. Avoid overcrowding the room; embrace the empty space as an integral part of the design.

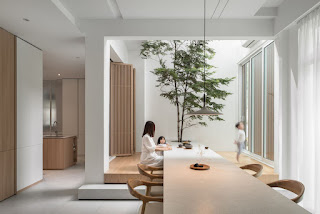
Designing an Elegant Dining Area with Asian Flair

For the dining area, consider a simple, rectangular dining table made of reclaimed wood. Pair it with elegant chairs crafted from bamboo or rattan, showcasing their natural textures. The tabletop might feature a minimalist design, perhaps a subtly carved edge or a simple, natural finish. Subtle lighting plays a crucial role. Choose a pendant light with a simple, understated design, or incorporate natural light through strategically placed windows. Avoid overly elaborate chandeliers or ornate lighting fixtures that might disrupt the minimalist aesthetic.

Bedroom Sanctuary: Asian-Inspired Tranquility

Transform your bedroom into a tranquil sanctuary by incorporating Asian-inspired elements. A low platform bed made of natural wood creates a calming focal point. Use natural fiber bedding, like linen or cotton, in neutral tones. A simple nightstand made of bamboo or rattan completes the look. Consider adding a few strategically placed plants to enhance the feeling of serenity. Remember, less is more; avoid cluttering the space with unnecessary furniture or accessories.

By thoughtfully incorporating these Asian-inspired design elements, you can create a home that is both minimalist and elegant, reflecting a deep appreciation for serenity and natural beauty. The result is a calming, sophisticated space that invites relaxation and contemplation.

Share:

Best DIY Wooden Rabbit House Plans for a Cozy Pet Shelter

Best DIY Wooden Rabbit House Plans for a Cozy Pet Shelter

Constructing a suitable habitat for your pet rabbit requires careful consideration of their specific needs. A well-designed rabbit house provides a safe, secure, and comfortable environment, promoting their overall health and well-being. This article explores various DIY wooden rabbit house plans, focusing on creating a cozy and enriching shelter for your furry companion. We will delve into design considerations, material selection, construction techniques, and essential features to ensure the optimal living space for your rabbit.

I. Design Considerations: Tailoring the House to Your Rabbit's Needs

Before embarking on the construction process, meticulous planning is crucial. The size, shape, and features of the rabbit house should be meticulously designed to meet your rabbit's specific requirements. Consider the following factors:

A. Size and Space Requirements:

The dimensions of the rabbit house are paramount. A cramped enclosure can lead to stress and behavioral problems. A general guideline is to provide ample space for your rabbit to comfortably hop, stretch, and engage in natural behaviors. For a single adult rabbit, a minimum floor space of 6 square feet is recommended, although larger is always preferable. Multiple rabbits will require proportionally more space, with at least 12 square feet per rabbit being a reasonable starting point. Consider the breed and size of your rabbit when determining the appropriate dimensions.

B. Indoor vs. Outdoor Housing:

The intended location of the rabbit house dictates specific design considerations. Indoor rabbit houses require less protection from the elements but must be well-ventilated to prevent ammonia buildup from urine. Outdoor houses need robust construction to withstand environmental factors like rain, wind, and extreme temperatures. For outdoor housing, consider features like raised flooring to prevent dampness and a sloped roof to facilitate water runoff.

C. Access and Maintenance:

Ease of access for cleaning and maintenance is essential. Design the house with a removable top or side panel for easy cleaning and bedding changes. This facilitates regular sanitation, reducing the risk of disease and parasite infestations. Consider incorporating a pull-out tray for the base to simplify cleaning procedures.

D. Security and Predation Prevention:

Robust construction is necessary to protect your rabbit from potential predators or escape attempts. Use sturdy materials and secure all joints and connections. For outdoor houses, consider burying the base slightly into the ground or using wire mesh to prevent digging escapes. Solid walls will prevent unwanted access. Ensure all openings are adequately sized to prevent escape while still allowing easy access for the rabbit and for cleaning.

II. Material Selection: Prioritizing Durability and Safety

Selecting appropriate materials is vital for creating a safe and durable rabbit house. Prioritize materials that are non-toxic, easy to clean, and resistant to damage from chewing and scratching. The following materials are frequently used in rabbit house construction:

  • Untreated Wood: Pressure-treated lumber contains chemicals that can be harmful to rabbits. Opt for untreated wood, such as pine or cedar, ensuring it is free from splinters and sharp edges. Avoid using redwood, as it contains toxins.
  • Plywood: Exterior-grade plywood is durable and weather-resistant, suitable for outdoor houses. Ensure all plywood edges are sanded smooth.
  • Wire Mesh: Wire mesh is commonly used for ventilation and to create run areas. Opt for galvanized wire mesh to prevent rust and ensure it is securely fastened to avoid injury to the rabbit.
  • Hardware: Stainless steel screws and other hardware are ideal as they are resistant to rust and corrosion. Avoid using galvanized nails as they can cause zinc poisoning.

III. Construction Techniques: Step-by-Step Guide

This section outlines a general approach to constructing a simple but effective wooden rabbit house. Specific dimensions can be adjusted to suit your rabbit's needs and available materials.

A. Building the Base and Frame:

Begin by constructing a sturdy rectangular base using the chosen wood. The base should be slightly larger than the intended interior dimensions. Assemble the sides and back using appropriate joinery techniques, ensuring the structure is strong and square. Secure all joints using screws or appropriate wood joinery.

B. Adding the Roof:

The roof should be sloped to allow for water runoff. Construct a gable roof or a simple shed roof using appropriately sized wood pieces. Attach the roof securely to the frame using screws or nails. Consider adding waterproof roofing material for outdoor houses.

C. Incorporating Ventilation:

Adequate ventilation is critical to prevent ammonia buildup and maintain a healthy environment. Incorporate small vents or openings in the sides or back of the house, covered with wire mesh to prevent escape but allow for airflow. Ensure the ventilation is sufficient to provide adequate air circulation without creating drafts.

D. Installing the Floor:

The floor should be solid and easy to clean. Use plywood or solid wood for the floor and ensure it is securely attached to the frame. For outdoor houses, consider elevating the floor slightly off the ground to prevent dampness.

E. Adding the Door and Access Panels:

Construct a hinged door or removable side panel for easy access to the interior. Use appropriate hinges and latches. Securely attach them to the frame. Ensure all openings are properly sized for easy entry and exit for your rabbit.

F. Finishing Touches:

Sand all surfaces smooth to prevent splinters. Apply a non-toxic sealant or paint if desired. Ensure all materials used are pet-safe. Add bedding and other accessories suitable for a rabbit habitat.

IV. Essential Features for a Cozy Rabbit House

Beyond the basic structure, incorporating these features will significantly enhance your rabbit's comfort and well-being:

  • Bedding: Provide a generous amount of soft, absorbent bedding such as hay or straw. Avoid using cedar or pine shavings.
  • Hidey-House: A small, enclosed area where your rabbit can retreat for security and rest. This could be a small box or tunnel inside the house.
  • Water Bottle: A secure water bottle attached to the side of the house, ensuring fresh water is readily available.
  • Food Bowl: A heavy, stable food bowl to prevent tipping.
  • Chew Toys: Provide wooden chew toys to satisfy your rabbit's natural chewing instincts. Avoid toxic materials.
  • Run Area: If space allows, consider incorporating an attached run area for exercise and exploration.

V. Conclusion

Building a DIY wooden rabbit house is a rewarding endeavor that allows you to create a customized and enriching environment for your pet. By carefully considering design, material selection, and construction techniques, you can build a safe, comfortable, and stimulating home for your rabbit. Remember to prioritize your rabbit's well-being throughout the design and construction process, ensuring their safety and happiness. Regular maintenance and cleaning are essential to maintaining a healthy and hygienic living space for your furry friend.

Share:

Storage Furniture Plans to Maximize Your Space

Storage Furniture Plans to Maximize Your Space

In contemporary living, maximizing space is paramount. Clutter not only detracts from aesthetic appeal but also contributes to a sense of confinement and stress. Strategic incorporation of custom-designed storage furniture presents a sophisticated solution to this pervasive problem. This article explores various plans and designs for creating bespoke storage solutions that seamlessly integrate into diverse living spaces, significantly enhancing both functionality and visual appeal.

Assessing Your Storage Needs: A Comprehensive Approach

Before embarking on the design phase, a thorough assessment of storage requirements is crucial. This involves a meticulous inventory of possessions, categorizing items based on frequency of use, size, and fragility. Understanding these factors will inform the design process and ensure optimal functionality of the final product.

Analyzing Item Categories and Frequency of Use

Categorizing items into frequently used, occasionally used, and rarely used will dictate their optimal storage location. Frequently accessed items should be placed in easily accessible areas, while less frequently used items can be stored in higher or less convenient locations. For example, everyday clothing might be stored in easily accessible drawers, whereas seasonal items could be housed in lofted storage or less visible areas.

Measuring Spaces and Identifying Storage Gaps

Accurate measurements are paramount. Detailed measurements of the designated storage area, including height, width, and depth, are essential for creating furniture that fits seamlessly. This process should also identify existing storage gaps or underutilized areas that can be optimized for increased storage capacity. For instance, the space under staircases or awkward corners often presents untapped storage potential.

Considering Material Durability and Aesthetic Preferences

The choice of materials significantly impacts both the durability and the aesthetic appeal of the storage furniture. Solid wood offers exceptional durability and a classic aesthetic, though it tends to be more expensive. MDF (Medium-Density Fiberboard) and particleboard present more budget-friendly options, but require careful consideration of their susceptibility to moisture and wear. Aesthetic preferences should also inform material selection, ensuring harmony with the existing décor of the space.

Custom Storage Solutions: Tailored Designs for Diverse Spaces

Custom-designed storage furniture offers unparalleled versatility, allowing for the creation of solutions perfectly tailored to individual needs and space constraints. This section explores various designs adaptable to different room types and architectural features.

Built-in Wardrobes and Closets: Maximizing Vertical Space

Built-in wardrobes and closets are particularly effective in maximizing vertical space, offering extensive storage capacity within a minimal footprint. Clever design can incorporate features such as pull-out drawers, adjustable shelves, and specialized hanging rods for optimal organization. Consider the incorporation of mirrored doors to enhance the sense of spaciousness and to reflect light, brightening the room.

Under-Stair Storage: Utilizing Often-Neglected Space

The space beneath staircases is often overlooked, presenting a valuable opportunity for creative storage solutions. Custom-built drawers, shelves, or even a small cupboard can transform this underutilized area into a functional storage space. The design should consider the staircase's incline and the available depth to ensure easy access to stored items.

Modular Storage Units: Adaptable and Flexible Solutions

Modular storage units offer unmatched adaptability. These units consist of individual components that can be arranged and rearranged to suit evolving needs and space configurations. Their flexibility makes them ideal for open-plan living areas or rooms with irregular shapes, allowing for the creation of bespoke storage solutions that seamlessly integrate into the existing environment.

Murphy Beds and Convertible Furniture: Space-Saving Innovations

In smaller spaces, Murphy beds and other forms of convertible furniture are invaluable for maximizing floor area. These space-saving designs combine sleeping and storage functionalities, creating a versatile solution ideal for apartments, guest rooms, or home offices.

Optimizing Design for Enhanced Functionality

The functionality of custom storage furniture is paramount. Several design features can enhance usability and make the most of the available space.

Adjustable Shelves and Drawers: Adapting to Changing Needs

Adjustable shelves and drawers provide flexibility to accommodate items of varying sizes and shapes. This adaptability ensures that the storage solution remains effective as storage needs evolve over time.

Pull-out Drawers and Baskets: Easy Access to Stored Items

Pull-out drawers and baskets enable easy access to stored items, eliminating the need for rummaging through cluttered shelves. This feature is particularly beneficial for frequently used items.

Hidden Compartments and Concealed Storage: Maintaining a Tidy Appearance

Hidden compartments and concealed storage help maintain a tidy appearance by keeping less aesthetically pleasing items out of sight. This is a valuable design element for maximizing visual appeal while ensuring sufficient storage capacity.

Soft-Close Hinges and Slides: Enhancing User Experience

Incorporating soft-close hinges and slides enhances the user experience by preventing loud bangs and minimizing the risk of damage to the furniture or stored items. This detail significantly improves the overall quality and longevity of the storage solution.

Conclusion: A Transformative Approach to Space Management

Implementing strategic storage furniture plans can significantly enhance the functionality and aesthetic appeal of any living space. By carefully assessing individual needs, meticulously measuring spaces, and selecting appropriate materials and design features, one can create custom storage solutions that effectively maximize space and enhance the overall living experience. The investment in well-designed storage furniture is not merely an expenditure but a transformative approach to space management, contributing to a more organized, efficient, and aesthetically pleasing home environment.

Share:

Craft Custom 4 Furniture Plans for Home and Office Designs

Crafting Custom Furniture: Four Plans for Home and Office

Tired of mass-produced furniture that lacks personality and practicality? Creating custom pieces allows you to perfectly tailor your space to your needs and aesthetic. This article presents four detailed furniture plans, blending functionality with style for both home and office environments. Get ready to transform your living and working spaces!

1. The Modern Minimalist Home Desk

Design Concept:

This desk embraces clean lines and a minimalist aesthetic, ideal for a contemporary home office or study. Its sleek design maximizes workspace while maintaining a sense of calm. We emphasize functionality and smart storage solutions. The desk's neutral palette allows for easy integration with any décor.

Materials Required:

Select high-quality materials for durability and longevity. Consider:

  • Wood: Birch plywood for the tabletop and legs, offering a smooth, light-colored surface. Alternatively, choose a darker wood like walnut for a richer look.
  • Metal: Powder-coated steel for the supporting frame and drawer pulls, ensuring both strength and a stylish finish.
  • Hardware: High-quality drawer slides for smooth operation and long-lasting use. Opt for minimalist drawer pulls that complement the desk's clean lines.

Construction Process:

Begin by cutting the plywood to the desired dimensions for the tabletop and legs. Assemble the metal frame, ensuring precise alignment. Attach the tabletop securely to the frame. Next, construct the drawers, using the chosen wood and hardware. Finally, install the drawers and attach the drawer pulls. Sand all surfaces smooth and apply a protective finish – a clear coat for the wood will enhance its natural beauty.

2. The Multifunctional Home Media Console

Design Concept:

This console cleverly combines media storage with additional shelving, offering a stylish and practical solution for your living room. Its design incorporates hidden compartments for clutter management, creating a clean and organized look. Customize the shelving to accommodate your specific needs – books, games, or decorative items.

Materials Required:

The choice of materials greatly influences the console's overall style. Consider using:

  • Reclaimed Wood: Adds a rustic charm and unique character. The varied tones and textures of reclaimed wood create a visually appealing piece.
  • Metal Accents: Incorporate metal legs or handles to add a touch of industrial chic. Black metal is a popular choice that complements various interior styles.
  • Hardware: Use robust hinges and drawer slides for reliable performance. Choose handles that match the overall aesthetic.

Construction Process:

Start by constructing the main body of the console, creating compartments for electronics and storage. Attach the legs securely, ensuring stability. Install shelving units according to your preferred layout. Carefully attach hinges to any doors and install drawer slides for smooth operation. Finish by applying a sealant to protect the reclaimed wood from moisture damage.

3. The Ergonomic Office Chair

Design Concept:

Prioritize comfort and ergonomics with this customizable office chair. Designed to promote good posture and reduce strain during long work sessions, this chair focuses on adjustable features and supportive components. The design allows for personalized adjustments to suit individual body types and preferences.

Materials Required:

The choice of materials directly impacts the chair's comfort and durability. Consider:

  • High-Density Foam: Provides superior cushioning and support for prolonged sitting. This foam retains its shape over time.
  • Breathable Fabric: Prevents overheating and ensures comfort during extended use. Choose a fabric that is easy to clean and maintain.
  • Durable Metal Frame: Provides a strong and stable base for the chair. Powder-coated steel offers a sleek look and prevents rust.

Construction Process:

Begin by constructing the metal frame, ensuring structural integrity. Cut and shape the high-density foam to create the seat and backrest. Carefully attach the foam to the frame, ensuring it is securely fastened. Upholster the chair using the chosen fabric, paying close attention to detail for a professional finish. Finally, assemble the adjustable mechanisms, allowing for personalized height and tilt adjustments.

4. The Executive Office Desk with Integrated Storage

Design Concept:

This desk exudes sophistication and functionality, ideal for a high-powered executive office. It seamlessly blends ample workspace with integrated storage solutions, keeping your workspace organized and clutter-free. The design prioritizes both style and practical considerations.

Materials Required:

Choose premium materials to reflect the desk's high-end design:

  • Solid Wood: Select a luxurious wood like mahogany or cherry for a sophisticated and timeless look. The rich grain adds elegance to the piece.
  • High-Quality Veneer: Offers a cost-effective alternative to solid wood while still maintaining an upscale appearance.
  • Metal Hardware: Utilize high-quality, brushed metal hardware for a polished and professional look. Choose durable drawer slides for effortless operation.

Construction Process:

Start by building the desk's frame using the chosen wood, ensuring precise measurements and joinery. Construct the drawers and install the drawer slides, ensuring smooth operation. Attach the top and side panels, creating a cohesive unit. Install the hardware, adding a finishing touch to the desk's aesthetic. Finally, apply a protective finish to the wood to enhance its beauty and durability. A rich stain will further emphasize the wood's natural grain.

Share:

DIY Furniture Plans Corner Shelves and Tables for Small Spaces

Maximize Your Small Space with DIY Corner Shelves and Tables

Cramped quarters got you down? Don't let a lack of space dictate your style! With a little creativity and some basic DIY skills, you can transform those awkward corners into functional and stylish storage solutions. This guide provides detailed plans for building corner shelves and tables perfectly suited for small spaces, maximizing your area without compromising on aesthetics. Prepare to unleash your inner builder and conquer your clutter!

Corner Shelves: A Space-Saving Solution

Corner shelves offer unparalleled space-saving potential. They utilize often-ignored vertical space, making them ideal for small apartments, studios, or even cluttered closets. This project requires minimal tools and materials, making it perfect for beginners. Let's dive into creating these indispensable additions to your home.

Materials You'll Need:

Before you begin, gather these essential materials:

  • Wood planks: Choose your preferred wood type and thickness (consider pine or plywood for ease of working). Calculate the length based on your desired shelf dimensions and the number of shelves you plan to build.
  • Wood screws: Opt for screws that are long enough to securely attach the shelves to the supports but not so long that they poke through.
  • Wood glue: This adds extra strength and stability to the joints.
  • Wall anchors and screws (if necessary): If you're mounting the shelves directly to the wall, choose appropriate anchors for your wall type.
  • Sandpaper: Smooth out any rough edges after cutting and assembling the shelves.
  • Wood stain or paint (optional): Customize the look to match your existing décor.
  • Level: Ensure your shelves are perfectly aligned.
  • Measuring tape: Accurate measurements are crucial for a successful project.
  • Saw (circular saw or hand saw): Cut the wood planks to size.
  • Drill: Used for creating pilot holes for the screws to prevent wood splitting.

Step-by-Step Construction:

Follow these steps to build your corner shelves:

  1. Measure and cut: Carefully measure the space where you'll install the shelves and cut the wood planks according to your design. Consider the depth and width of each shelf.
  2. Assemble the shelves: Use wood glue and screws to join the planks together, forming a stable structure for each shelf. Pre-drill pilot holes to prevent splitting.
  3. Sand and finish: Sand down any rough edges or imperfections. Apply wood stain or paint, letting it dry completely before proceeding.
  4. Install the shelves: Securely mount the shelves to the wall using appropriate anchors and screws, ensuring they are level.

Corner Tables: Stylish and Functional

Corner tables offer a blend of style and functionality, perfect for small spaces. They can serve as end tables, nightstands, or even small desks. This project involves slightly more complex joinery, but the result is a truly custom piece that perfectly fits your space.

Materials and Tools:

This project requires slightly more advanced materials and tools than the shelves. You will need:

  • Larger wood planks: Calculate the dimensions based on your desired table height and top size.
  • Wood dowels or corner brackets: These will strengthen the table's corners and provide stability.
  • Wood screws, wood glue, sandpaper, stain/paint: As in the shelf project.
  • Kreg jig (recommended): This tool makes creating pocket holes for screws easier and stronger.
  • Clamps: Hold the pieces together while the glue dries.

Building Your Corner Table:

Constructing a corner table is a rewarding project. Here's a simplified approach:

  1. Cut the legs and tabletop: Carefully cut the wood to the correct sizes. Consider using a Kreg jig to create pocket holes for secure joints.
  2. Assemble the legs: Join the legs using dowels or corner brackets, ensuring they are square and stable.
  3. Attach the tabletop: Securely fasten the tabletop to the assembled legs using screws and wood glue, ensuring it is level.
  4. Sand, finish, and enjoy: Sand all surfaces, apply your chosen stain or paint, and allow it to dry completely before using your new table.

With a little effort and these detailed plans, you can easily create stunning, space-saving corner shelves and tables. Remember to always prioritize safety and take your time – the results will be well worth it! Happy building!

Share:

Great Beginner Woodworking Projects for Quick Success

Ignite Your Inner Craftsperson: Beginner Woodworking Projects for Instant Gratification

Stepping into the world of woodworking can feel daunting, but it doesn't have to be! With the right approach and a few carefully chosen projects, you can quickly experience the satisfaction of creating something beautiful and functional with your own two hands. Forget complex joinery and intricate designs for now; this guide focuses on beginner-friendly projects that deliver quick wins, boosting your confidence and inspiring you to tackle more ambitious endeavors later on. Prepare to be amazed by what you can accomplish!

Simple Shelves: Your First Woodworking Triumph

Building shelves is a classic beginner project, and for good reason. It introduces you to fundamental woodworking skills like measuring, cutting, and assembling, all while resulting in a practical and stylish addition to your home. Start with a simple design: two or three shelves supported by brackets or cleats. Choose a readily available wood like pine or poplar for its ease of working. Precise measurements are key; double-check your cuts before securing anything. This project provides valuable experience in using a saw (hand saw or circular saw) and a drill, and it teaches you about proper wood fastening techniques. The satisfaction of installing your perfectly crafted shelves will fuel your woodworking passion!

Essential Supplies for Shelf Construction:

  • Wood boards (pine or poplar recommended)
  • Wood screws
  • Measuring tape
  • Saw (hand saw or circular saw)
  • Drill
  • Level
  • Screwdriver (or drill with screwdriver bit)
  • Wood glue (optional, for extra strength)

Coasters: A Quick and Adorable Project

If you're looking for an even faster project that showcases your newfound skills, try making a set of coasters. These are perfect for practicing precise cutting and sanding techniques. Select attractive wood scraps, or purchase pre-cut squares from a craft store. You can simply sand them smooth and apply a protective finish like varnish or polyurethane for a sleek look, or get creative with designs using wood burning tools or paint. Remember to sand thoroughly to prevent splinters and create a smooth surface. These charming coasters will not only protect your furniture but also serve as a testament to your burgeoning woodworking abilities.

Embellishing Your Coasters:

  • Apply a stain for a rich color.
  • Use wood burning tools to create intricate designs.
  • Add a decorative edge using a router (if you have one).
  • Seal with a clear finish for protection.

A Rustic Picture Frame: Showcasing Your Creativity

Crafting a picture frame offers a fantastic opportunity to personalize your woodworking journey. Start with a simple design – a square or rectangular frame – using readily available wood. Cut your pieces to the desired length, paying close attention to mitered corners for a professional finish. While miter saws make this easier, you can achieve neat corners with a hand saw and careful measuring. Remember to account for the thickness of the wood when calculating the frame's inner dimensions to fit your picture. Once assembled, sand the frame smooth and finish it with paint, stain, or a clear coat to complement your chosen artwork. Displaying your cherished photos in your handmade frame will be a source of immense pride.

These projects are merely a starting point. As you gain confidence, you can progressively tackle more challenging designs. The key is to start small, celebrate your successes, and let your creativity guide you on this exciting woodworking journey. Happy crafting!

Share:

Custom DIY Plans for Furniture Woodwork and Outdoor Living

Unleash Your Inner Carpenter: DIY Plans for Furniture, Woodwork & Outdoor Living

Hey there, fellow DIY enthusiasts! Are you itching to create something amazing with your own two hands? Whether you're a seasoned woodworker or just starting out, the world of DIY projects is brimming with possibilities. This guide is packed with ideas and inspiration to help you build incredible furniture, stunning woodwork, and cozy outdoor living spaces – all from the comfort of your own workshop (or garage, or even your driveway!). Get ready to roll up your sleeves and let's dive in!

Furniture Projects: From Simple to Stunning

Building your own furniture is incredibly rewarding. It's a chance to create pieces that perfectly match your style and needs, and you'll save a ton of money in the process! Let's explore some exciting furniture projects you can tackle:

Beginner-Friendly Furniture

If you're just starting your DIY journey, don't feel intimidated. These projects are perfect for beginners and will help build your confidence:

  • Simple Bookshelf: A classic project that teaches fundamental joinery techniques. You can find tons of free plans online for different styles.
  • Floating Shelves: These are super stylish and surprisingly easy to make. They're great for adding extra storage and personality to any room.
  • Basic Coffee Table: Choose a simple design with straightforward cuts and minimal joinery. You can even upcycle old pallets for a rustic look!

Remember, even simple projects can be customized. Choose your favorite wood stain or paint to personalize your creation!

Intermediate Furniture Challenges

Feeling more confident? Let's tackle something a bit more challenging:

  • Dining Table: This is a fantastic project that will truly impress. Consider a farmhouse style or a more modern design, depending on your taste.
  • Headboard: Transform your bedroom with a custom-built headboard. You can create a stunning statement piece using reclaimed wood or even fabric upholstery.
  • Entryway Bench: A practical and stylish addition to your home, a DIY entryway bench provides a place to sit and store shoes.

For intermediate projects, you might want to invest in some better quality tools and take your time planning each step meticulously. Accurate measurements are key!

Advanced Furniture Projects (For the Bold!)

Ready to push your skills to the limit? Here are some ambitious furniture projects that will truly test your woodworking prowess:

  • Custom Wardrobe: Design a wardrobe that perfectly fits your space and style. This requires precise planning and expert joinery skills.
  • Mission-Style Desk: Embrace the clean lines and timeless beauty of Mission style furniture. These projects often require hand-cut joinery.
  • Full-Size Bed Frame: A truly impressive undertaking, building a bed frame from scratch will require detailed planning and advanced woodworking skills.

These advanced projects might require more specialized tools and a deeper understanding of woodworking techniques. Don't be afraid to seek guidance from experienced woodworkers or online communities.

Intricate Woodwork: Adding Character to Your Home

Beyond furniture, there's a whole world of captivating woodwork projects you can explore to enhance your home's beauty and functionality.

Smaller Woodworking Projects

Perfect for honing your skills and adding unique touches:

  • Picture Frames: Create custom frames to showcase your cherished photos and artwork.
  • Cutting Boards: A practical and beautiful kitchen accessory, a homemade cutting board makes a great gift.
  • Wall Shelves: Add character and storage with uniquely designed wall shelves.

More Ambitious Woodwork Projects

For those seeking a greater challenge:

  • Custom Mantelpiece: Elevate your fireplace with a hand-crafted mantelpiece. This will be a focal point of your room!
  • Wooden Toys: Create unique and durable toys for children.
  • Detailed Intarsia or Marquetry: These advanced techniques involve creating intricate designs using inlaid wood pieces.

Remember to always prioritize safety when working with woodworking tools. Always wear appropriate safety gear, and take your time!

Outdoor Living Spaces: DIY Decks, Pergolas, and More

Extend your living space outdoors with these fantastic DIY projects:

Creating a Backyard Oasis

Transform your outdoor area into a relaxing haven:

  • Simple Deck: A DIY deck is a fantastic way to add value and enjoyment to your home.
  • Pergola: Create a shady and stylish seating area with a DIY pergola.
  • Outdoor Planters: Build custom planters to showcase your favorite flowers and plants.

Advanced Outdoor Projects

For those ready to tackle bigger projects:

  • Gazebo: A gazebo is a beautiful addition to any yard, providing a shaded area for relaxation and entertaining.
  • Outdoor Kitchen: Build an outdoor kitchen to enhance your outdoor cooking experience.
  • Fence: Create a beautiful and functional fence to enclose your property.

Outdoor projects often involve working with pressure-treated lumber or other weather-resistant materials. Remember to check local building codes before beginning your project.

Commonly Asked Questions

Q: What tools do I need to get started?

A: It depends on the project, but basic tools include a measuring tape, saw (hand saw or circular saw), drill, screwdriver, sandpaper, and safety glasses.

Q: Where can I find free DIY plans?

A: Many websites offer free DIY plans, including Ana White, Instructables, and Pinterest. Just search for the type of project you're interested in.

Q: What type of wood should I use?

A: The best type of wood depends on the project. Pine is affordable and easy to work with, while hardwoods like oak and maple are more durable but more expensive.

Q: What if I make a mistake?

A: Don't worry! Everyone makes mistakes. Just learn from them and try again. Wood filler and sandpaper can often fix minor imperfections.

Q: How long will a project take?

A: That depends entirely on the complexity of the project and your experience level. Simple projects can be completed in a weekend, while more complex projects might take weeks or even months.

So there you have it! A wealth of ideas to spark your creativity and get you started on your DIY adventure. Remember to plan carefully, choose your projects wisely, and most importantly, have fun! Happy building!

Share:

Search This Blog

Powered by Blogger.

Asian-Inspired Furniture Plans for Minimalistic and Elegant Homes

Asian-Inspired Furniture Plans for Minimalistic and Elegant Homes The serene beauty of Asian design offers a wealth of inspiration for cre...

Recent Posts

Theme Support